
View the list of administrative tutorials below. Click on a topic of choice to view instructions.
GETTING STARTED
This section covers most of your starting skills needed to effectively manage your website.
This tutorial introduces you to the following common elements of your admin tools:
- Your admin dashboard
- “Widgets”: Open, Closing and Moving Them.
- Screen Options
- Customizing Your Edit Pages.
DIFFERENT EDITORS:
When editing a page, blog post, or other types of records, you have access to several different “editors”. These will change what you see when editing the page, its layout, and more.
- CLASSIC EDITOR: The most simplistic editor, works like a basic word processing software editor. You will know if you are viewing this one if the options just above the content say ‘BACKEND EDITOR | FRONTEND EDITOR’. In addition you will see tabs above the content towards the right which say:
- VISUAL: This is the general “select something, then click a button to format” view.
- TEXT: This is the HTML or CODE view. Only for advanced users, but if you see “code” then ensure the ‘VISUAL’ tab is clicked upon.
- BACKEND EDITOR: This is the powerful ‘WPBAKERY PAGE BUILDER’ set of advanced tools. You will know if you are viewing this one if the options just above the content say ‘CLASSIC MODE | FRONTEND EDITOR’. See the ADDITIONAL DOCUMENTATION > WPBAKERY link for details and tutorials on using this.
ADDITIONAL DOCUMENTATION:
GETTING STARTED - SUGGESTED MAINTENANCE
This section details suggested tasks that you should do for normal maintenance of your website.
Your website saves copies of all inquiry form submissions from your customers. As such it is recommended that you delete old inquiries.
SUGGESTED FREQUENCY: Weekly or Monthly
INSTRUCTIONS: As follows:
FOR WP FORMS:
- Go to WPFORMS > and click on ENTRIES.
- Click on the form of your choice to view entries.
- For each entry you wish to delete place a checkmark in the left column, then from the “bulk actions” filter above the list, select “delete” then click “apply” button.
FOR GRAVITY FORMS:
- Go to FORMS > to view your inquiry forms.
- In the ENTRIES column next to the form of choice, click on the number displayed. This is the number of saved submissions.
- The entries that are BOLD have not been read yet via admin tools, but may have been read via email. Optionally click on one to read it, print it, or optionally add notes if you wish to save it.
- To delete it place a checkmark in the BULK ACTIONS column, then from BULK ACTIONS drop down select TRASH and click APPLY.
- Upon page refresh click on the TRASH filter, then click EMPTY TRASH.
- Repeat the above steps for each inquiry form.
Your admin tools come complete with an easy way to perform full or partial website backups.
SUGGESTED FREQUENCY: Weekly
INSTRUCTIONS: As follows:
- Go to BACKUP TOOLS > BACKUPS.
- This page shows your most recent manual backups. If you haven’t already done so, click to DOWNLOAD the most recent one. When the download is complete, click to DELETE it to save space.
- To create a backup:
- To create a full backup, click ‘CREATE BACKUP’ button. Leave this page open until it completes.
- To create a partial backup (i.e. database only, or media files only, etc.) go to BACKUP TOOLS > EXPORT > click ADVANCED and then check the items you DON’T want backed up. (i.e. in example to backup database only, check everything expect “database” option).
CATALOG / PRODUCT MANAGEMENT TOOLS
This section covers management of your catalog PRODUCTS, LISTING SUBSCRIPTIONS and other related content.
These instructions show you how to manually create and update your products.
CREATE & MANAGE PRODUCTS:
https://docs.woocommerce.com/documentation/plugins/woocommerce/getting-started/setup-products/
GROUPED PRODUCTS:
Do you have a group of products you want to sell under a single product? This is the tutorial for you:
These instructions show you how to manually update your subscription listing products.
UPDATING SUBSCRIPTION LISTINGS:
- On the left menu click on PRODUCTS, then locate your subscription listing product you wish to update. The naming structure for these are ‘DIRECTORYNAME – Standard Listing’ by default.
- Mouse over your selected product and click EDIT.
- Update values within the GENERAL tab as follows:
- Subscription price: This controls how much you wish to charge for each month, year, etc.
- Expire after: This determines if the subscriptions ever expire or not. We recommend leaving it to default of “Never expire”.
- Sign-up fee: This is the amount of the one time amount your customer is charged.
- Free trial: This option offers your customers X days for free before they are charged.
- Sale price: This is the sales price that overwrites your “Subscription price”, so set this as a lower price. You can also optionally click the “Schedule” link to set start and end dates on this price.
- Optionally click on the PLAN FEATURES tab to adjust the fields and content allowed for this plan.
- Scroll down further to update the “Product short description” area, which is the small description that shows next to the subscription option to customers.
- Finally scroll back up and click on the UPDATE button to save your changes.
Please note: Changing the prices above will only effect new customer purchases, not existing ones. If you wish to adjust existing subscription prices, please see the ‘SUBSCRIPTION MANAGEMENT’ section for details.
UPDATING FEATURED SUBSCRIPTION PRODUCTS:
This is instructions for updating your “FEATURED LISTINGS ADD-ONS”, i.e. 7 days, 14 days, etc.
- On the left menu click on PRODUCTS, then locate your subscription listing product you wish to update. The naming structure for these are ‘FEATURED LISTING – 7 Days’ by default.
- Mouse over your selected product and click EDIT.
- Update values within the GENERAL tab as follows:
- Regular Price: This is the normal price for this ‘FEATURED’ product.
- Sale price: This is the optional sale price. You can also click on the “Schedule” link to set start / end date for the sales price.
- Click on the PLAN FEATURES tab to modify the FEATURED options as follows:
- Display as featured: Ensure this is checked.
- Priority: By default set to HIGH. Only necessary to change if you intend to offer various levels of ‘FEATURED’ listings.
- Other settings: The remaining settings areas allow you to offer more categories, tags, locations, etc. for ‘FEATURED LISTING’. We recommend leaving it as default, which is 0 (i.e. it won’t add any additional ones).
- Scroll down further to update the “Product short description” area, which is the small description that shows next to the subscription option to customers.
- Finally scroll back up and click on the UPDATE button to save your changes.
- Go to PRODUCTS > and search for your product of choice.
- Mouse over the product name and click on the ‘TRASH’ link, then confirm.
- On page refresh click on the TRASH filter above the products, then click EMPTY TRASH.
*Please note: If you accidentally delete one of the associated subscription products for your directory, it will no longer be available on the front end and must be recreated. Be cautious when deleting products.
Your custom website includes functionality that allows you to offer free gifts / products based upon how much a customer purchases. This includes:
- Buy X, get Y for free.
- Spend X, get Y for free.
See full details and documentation below:
https://ithemelandco.com/docs/free-gifts-for-woocommerce/category/plugin-usage/
UPDATE FREE GIFT CARDS:
Your website has one free gift card setup for each restaurant, which you can easily update or disable. If you wish to update the free / bonus gift cards, do the following from admin tools:
1. On left column click on PRODUCTS, locate the products called “$X Bonus Gift Card – RESTAURANTNAME” and click to edit it.
2. Adjusting text content: Adjust text content as desired.
3. Adjusting the price: If you wish to change it from the default $25 to another amount, say $20 in example;
- Change the title from “$X Bonus Gift Card” to “$Y Bonus Gift Card” using the amount of your choice.
- Scroll down to the “Product Data” section, and change the “regular price” to your new desired amount.
4. Scroll up and click on the UPDATE button in the right column to complete.
IMPORTANT: If you change the value of the free gift card(s), ensure that you change the dollar amount in any pages where you mention “Spend $X and get $Y”.
CHANGE AMOUNT TO SPEND:
If you want to change the amount needed to be spent to earn the free gift card, do the following:
1. In the left hand column menu click on “Woo Free Gift”.
2. Locate the rule called “FREE Gift Card”, and click anywhere on it to expand its settings.
3. Go down to the “Quantities & Settings” section, and adjust the values seen there as desired. So in example you will see
200 | 1
This indicates that if someone spends between $200, they get to choose 1 free gift card, which this repeats for every $200 they spend.
4. Click “Save Changes” button.
DISABLE FREE GIFT CARD:
If you wish to disable the free gift card, do the following from admin tools:
1. In the left hand column menu click on “Woo Free Gift”.
2. Locate the rule called “FREE Gift Card”, and on the right side of its name, select “DISABLED”, then click the ‘SAVE CHANGES’ button at the bottom.
3. To enable it again, simply select “Enable” from the drop down, then click the ‘SAVE CHANGES’ button at the bottom.
Your custom website includes functionality that allows customers to store multiple shipping addresses, to make it easier to buy gift cards to ship to other people.
ADJUST OPTIONS:
1. Hover over WOOCOMMERCE > then click on MULTIPLE ADDRESSES.
2. Click on the SHIPPING SETTINGS tab.
3. Adjust the number of allowed stored shipping addresses, or other options.
4. Scroll to bottom of the page and click SAVE CHANGES
FULL DOCUMENTATION:
This is available below.
Multiple Customer Addresses
CONTENT - BLOG MANAGEMENT
This section covers management of your website BLOG articles.
*NOTE: Your website currently isn’t setup to display blog articles. Please contact your web development team if you wish to use this feature.
To create a “In the News” blog article or other blog article, do the following:
- On the left column menu mouse over BLOG / NEWS and click on ADD NEW.
- Add your title.
- Page builder: Click the blue “backend editor” button below the title, then within the WPBAKERY PAGE BUILDER click the “theme layout” button (or if you instead see “classic mode”, move onto the next step).
- Click on the “DEFAULT LAYOUT” button.
- Click “ADD TEXT BLOCK” button, then mouse over the “I am text block” and click the edit icon, then add your article content, and click “save changes” button.
TIP: To ensure that your blog summaries (found on the In the News page) show same number of lines, ensure that your blurb for the blog is at least 3 lines long (i.e. at least 108 characters including spaces). - PDF Download: If this is a PDF download article, also do the following:
- Open a second tab / window to admin tools and go to MEDIA LIBRARY, then click on “Add New”, “Select Files”, then locate your PDF and upload it. Upon completion click on its thumbnail to get a popup and then on right side click on “Copy URL to clipboard” button.
- Just below the text click on the + symbol within the grey frame border.
- In the window that comes up click “MY ELEMENTS” filter or search for and click on “BUTTON – Download PDF”.
- Mouse over the DOWNLOAD PDF button and click on the edit icon.
- Go down to the ‘URL (Link)’ section and click the “Select URL” button, then paste the PDF URL you copied in previous step into the URL field.
- Check the “Open link in a new tab”, and finally click the “Set Link” button.
- In the previous window click on the “Save changes” button.
- Featured Image: On the right side column look for the “Featured Image” box and click on “set featured image” to upload an image*, select it, then click the “set image” button.
TIP: Your images should ideally all be the same proportions (i.e. all square or rectangular) and should ideally be above 900×900 pixels in size to ensure proper display. If you are using rectangular images, the suggested size would be 900×600 pixels in size. - Categories: On right side column look for the “Categories” box and check any relevant categories.
- Tags: On the right side column look for the “tags” box. Here you can type in #hashtags which act as keywords. I.E. “My hashtag”.
- On right side column near the top look for the publish box and do the following:
- Past date: If this article is for a past date, look for the “Published on” and click edit, then enter the date.
- Future date: If you want to create an article and have it publish on a future date, follow the same instructions as above and enter a future date.
- Today: If this article is for the same day you are adding it, do nothing for this section and it will automatically add it.
- Click on the “PUBLISH” or “UPDATE” or “SCHEDULE” button (depending on the actions you took determines the name of the button).
Here is an optional video tutorial to help:
To update an “In the News” blog article or other blog article, do the following:
- On the left column menu mouse over BLOG / NEWS.
- Locate your select blog, then click to edit it.
- Edit your blog as desired.
- Categories: On right side column look for the “Categories” box and check / uncheck categories as desired.
- Tags: On the right side column look for the “tags” box and modify as desired.
- Click on the “PUBLISH” or “UPDATE” or “SCHEDULE” button (depending on the actions you took determines the name of the button.
CONTENT - HOME PAGE TESTIMONIALS
This section covers management of your website home page TESTIMONIALS.
1. In the left column menu click on PAGES, then locate the HOME page and click to edit it.
2. Scroll down to the section where you see multiple widgets called “Porto Testimonial”.
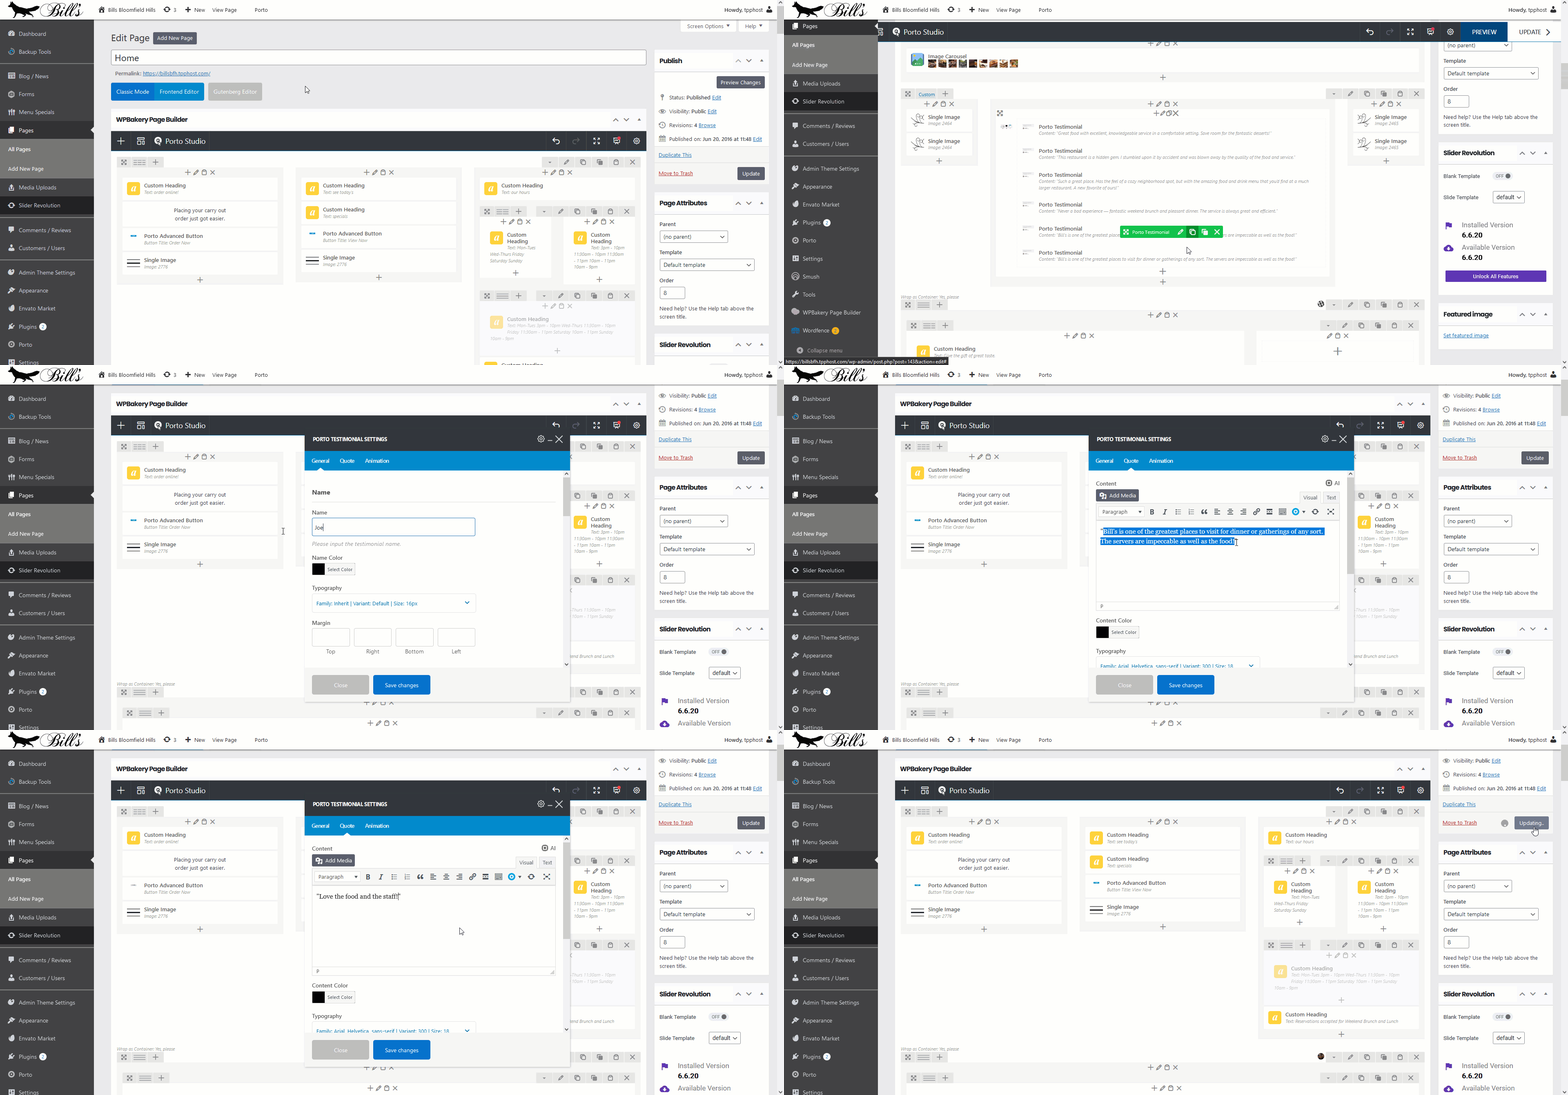
3. Mouse over the bottom most one and click on the copy icon.
4. Mouse over the new one on the bottom and click the edit icon.
5. In the GENERAL tab, change the name as desired, then click ‘SAVE CHANGES’ button.
6. Click on the QUOTE tab, then replace the existing quote / testimonial with your new one. For consistancy we recommend you surround it with quotes. Then click the ‘SAVE CHANGES’ button.
7. Scroll up and in the right column click on the ‘UPDATE’ button to finish.
1. In the left column menu click on PAGES, then locate the HOME page and click to edit it.
2. Scroll down to the section where you see multiple widgets called “Porto Testimonial”.
3.Mouse over the one you wish to delete, then click the X to delete it and confirm.
4. Scroll up and in the right column click on the ‘UPDATE’ button to finish.
CONTENT - GALLERY MANAGEMENT
This section covers management of your website GALLERY page.
1. In the left column menu click on PAGES, then locate the GALLERY page and click to edit it.
2. Scroll down to the section with the tabs for your gallery (i.e. FOOD, DRINK, ATMOSPHERE) and click on the tab you wish to add photos.
3. Mouse over the ‘MEDIA GRID’ widget and click the edit icon.
4. Click on the green + icon to open the media library.
5. From the ‘Upload files’ tab, click the “select files” button to locate your image(s), locate it then click “Open” for all new images you wish to add.
6. After it finishes uploading it will be auto selected with a check mark.
7. Scroll up and in the right column click the ‘UPDATE’ button to finish.

CONTENT - MENU MANAGEMENT
This section covers management of your website MENU page and related functions.
1. In the left column menu click on MENU SPECIALS, then locate the special you wish to edit and click to edit it.

2. Click into the content area and edit the special as follows:
- Type in or copy / paste your item. Ensure there is a line break between each item title and its description (if any).
- Select the entire item title line and from the “paragraph” drop down menu (left of B), select “Heading 4”.
- Now select just the price within that line and click the “B” button to bold it.
3. Scroll up and in the right column click the ‘UPDATE’ button to finish.
1. In the left column menu click on PAGES, then locate the MENUS page and click to edit it.
2. Scroll down to the sections area of the MENUS page, and click to expand (or collapse) the section you want to update.

3. After expanding the section you wish to edit items, mouse over the text area of choice and click on the edit icon and edit as follows:
- Type in or copy / paste your item. Ensure there is a line break between each item title and its description (if any).
- Select the entire item title line and from the “paragraph” drop down menu (left of B), select “Heading 4”.
- Now select just the price within that line and click the “B” button to bold it.

4. Scroll up and in the right column click the ‘UPDATE’ button to finish.
1. In the left column menu click on PAGES, then locate the MENUS page and click to edit it.
2. Scroll down to the sections area of the MENUS page, and click to expand (or collapse) the section you want to update.
3. After expanding the section you wish to edit items, mouse over the text area of choice and click on the edit icon, edit as desired, then click the ‘SAVE’ button.

4. Scroll up and in the right column click the ‘UPDATE’ button to finish.
1. In the left column menu click on PAGES, then locate the MENUS page and click to edit it.
2. Scroll down to the sections area of the MENUS page, and click to expand (or collapse) the section you want to update.
3. After expanding the section you wish to add an image to, locate an existing image widget in that section, mouse over it, click on the copy icon, then drag and drop it into the location you want it to appear.

4. Click on the edit icon, then scroll down and click on the green + icon to open the media library.
5. From the ‘Upload files’ tab, click the “select files” button to locate your image, locate it then click “Open”.
6. After it finishes uploading it will be auto selected. In the right column click into the “Alt Text” field and add the name you want to be displayed below it. Repeat for the “Captions” section, then click the “Set image” button at the bottom of that column.
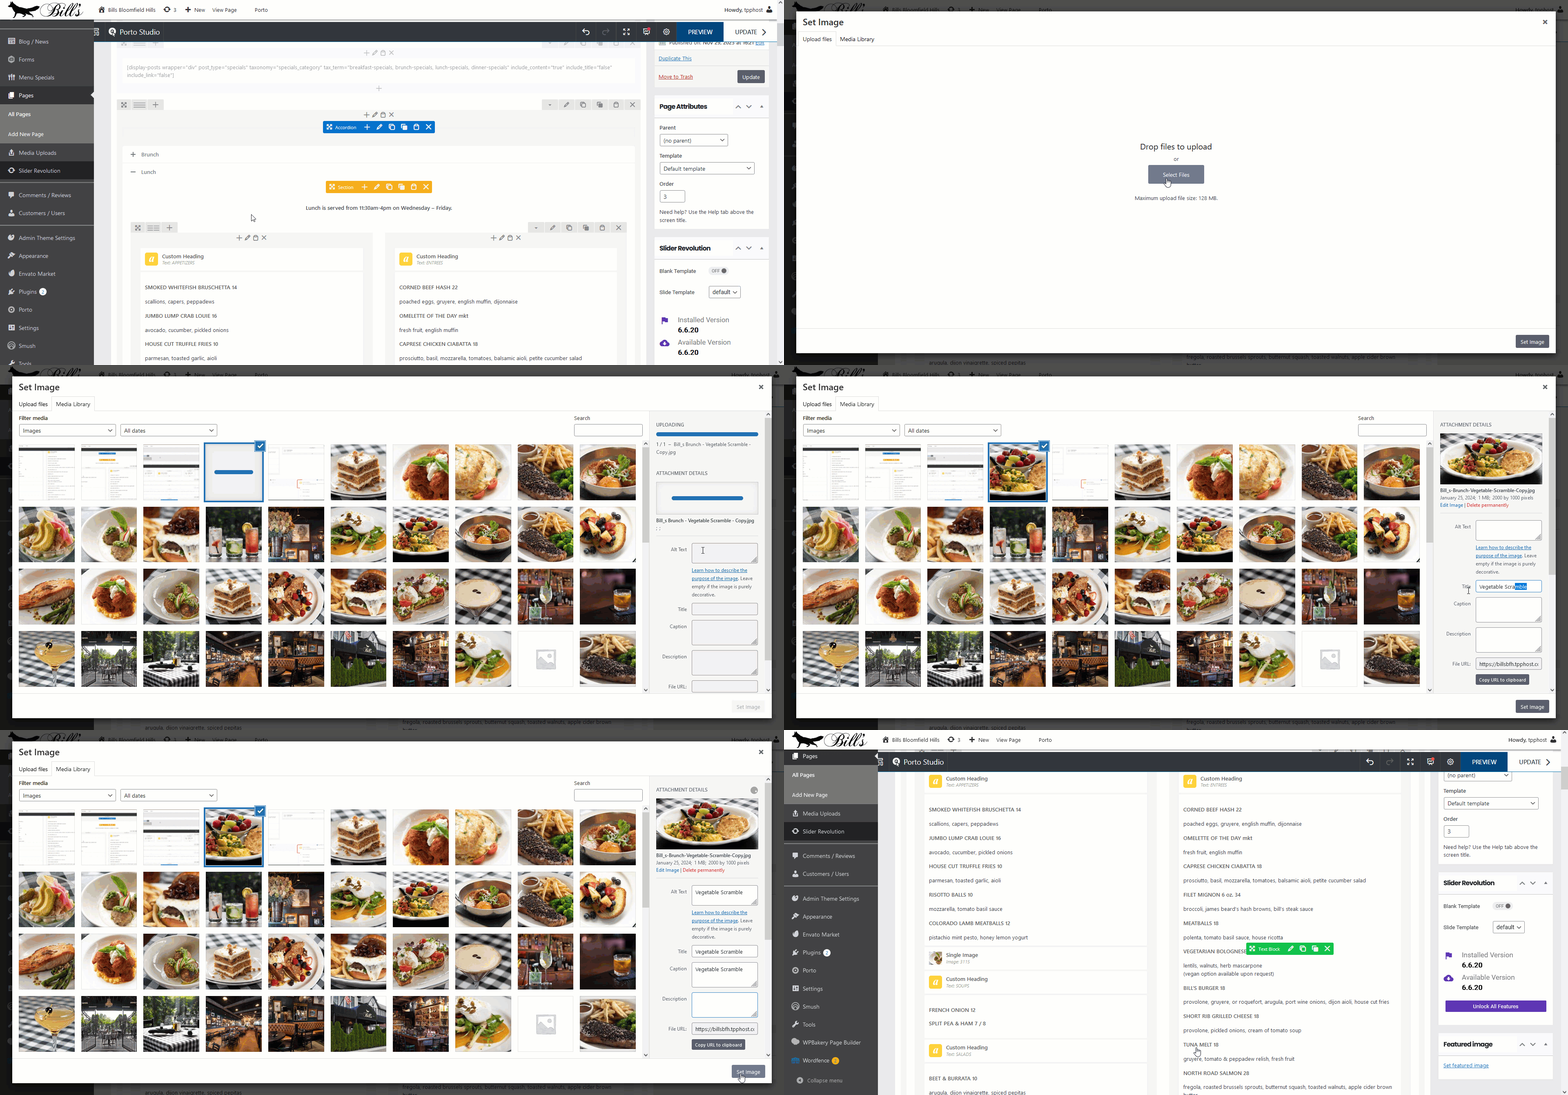
7. Scroll up and in the right column click the ‘UPDATE’ button to finish.
1. In the left column menu click on PAGES, then locate the MENUS page and click to edit it.
2. Scroll down to the sections area of the MENUS page, and click to expand (or collapse) the section you want to update.
3. After expanding the section you wish to edit items, locate the image you wish to replace, mouse over it, click on the edit icon, then scroll down and click on the green + icon to open the media library.
4. From the ‘Upload files’ tab, click the “select files” button to locate your image, locate it then click “Open”.
5. After it finishes uploading it will be auto selected. In the right column click into the “Alt Text” field and add the name you want to be displayed below it. Repeat for the “Captions” section, then click the “Set image” button at the bottom of that column.
6. Scroll up and in the right column click the ‘UPDATE’ button to finish.
To make this process as easy as possible for you to update your menu PDFs, we recommend keeping the file names the same when you create new ones. The existing ones are named as follows:
- menu-brunch.pdf
- menu-lunch.pdf
- menu-dinner.pdf
- menu-socialhour.pdf
- menu-dessert.pdf
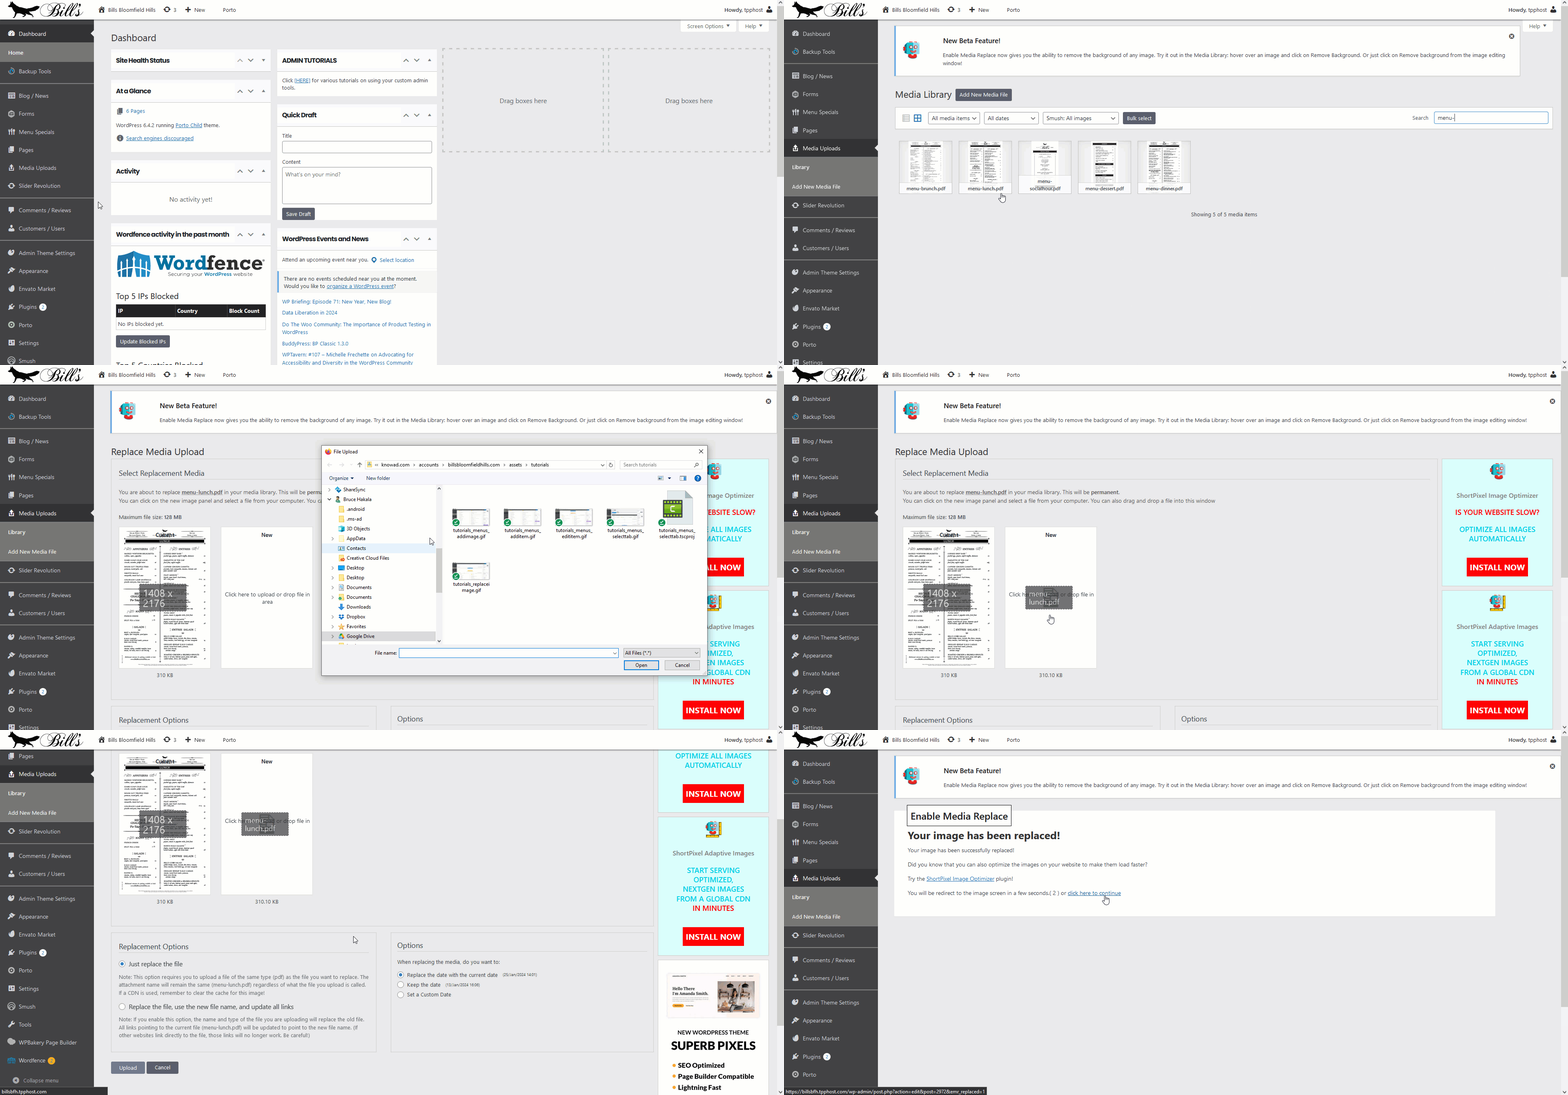
1. On the left column menu, click on MEDIA UPLOADS.
2. In the search bar on the top right, type in “menu-” and click to search. You will see your menu PDFs.
3. Click on the one you wish to replace with an updated version, then on the right side click on the ‘UPLOAD A NEW FILE’ button.
4. Follow the instructions on screen to upload a replacement menu PDF, and set the options on bottom as follows:
- Replacement Options: If you are using same file name (suggested), then select “Just replace the file”. If you are using a different file name, then select “Replace the file, use new file name, and update all links”.
- Options: Set to “Replace the date with the current date”.
CONTENT - PAGE MANAGEMENT
This section covers management of your website PAGES.
- SHORTCODES: When editing a page you will likely see something called “short codes”. These special codes look similar to this [wpsomething]. Ensure that you avoid deleting or modifying these at all costs.
To create a new page, do the following:
- On the left column menu mouse over PAGES and click on ADD NEW.
- Add your title.
- Page builder: Click the blue “backend editor” button below the title, then within the WPBAKERY PAGE BUILDER click the “theme layout” button (or if you instead see “classic mode”, move onto the next step).
- Click on the “DEFAULT LAYOUT” button.
- Click “ADD TEXT BLOCK” button, then mouse over the “I am text block” and click the edit icon, then add your article content, and click “save changes” button.
- Featured Image: On the right side column look for the “Featured Image” box and click on “set featured image” to upload an image*, select it, then click the “set image” button.
TIP: Your images should ideally all be the same proportions (i.e. all square or rectangular) and should ideally be above 900×900 pixels in size to ensure proper display. If you are using rectangular images, the suggested size would be 900×600 pixels in size. - On right side column near the top look for the publish box and do the following:
- Past date: If this article is for a past date, look for the “Published on” and click edit, then enter the date.
- Future date: If you want to create an article and have it publish on a future date, follow the same instructions as above and enter a future date.
- Today: If this article is for the same day you are adding it, do nothing for this section and it will automatically add it.
- Click on the “PUBLISH” or “UPDATE” or “SCHEDULE” button (depending on the actions you took determines the name of the button).
As follows:
UPDATING CONTENT:
- On the left column menu mouse over BLOG / NEWS.
- Locate your select blog, then click to edit it.
- Edit your blog as desired (see Updating Mobile Content section further down for additional instructions).
- Categories: On right side column look for the “Categories” box and check / uncheck categories as desired.
- Tags: On the right side column look for the “tags” box and modify as desired.
- Click on the “PUBLISH” or “UPDATE” or “SCHEDULE” button (depending on the actions you took determines the name of the button.
UPDATING MOBILE CONTENT:
Some pages contain duplicate sections to cover desktop and mobile for layouts. You can identify these duplicate sections similar to the example below:
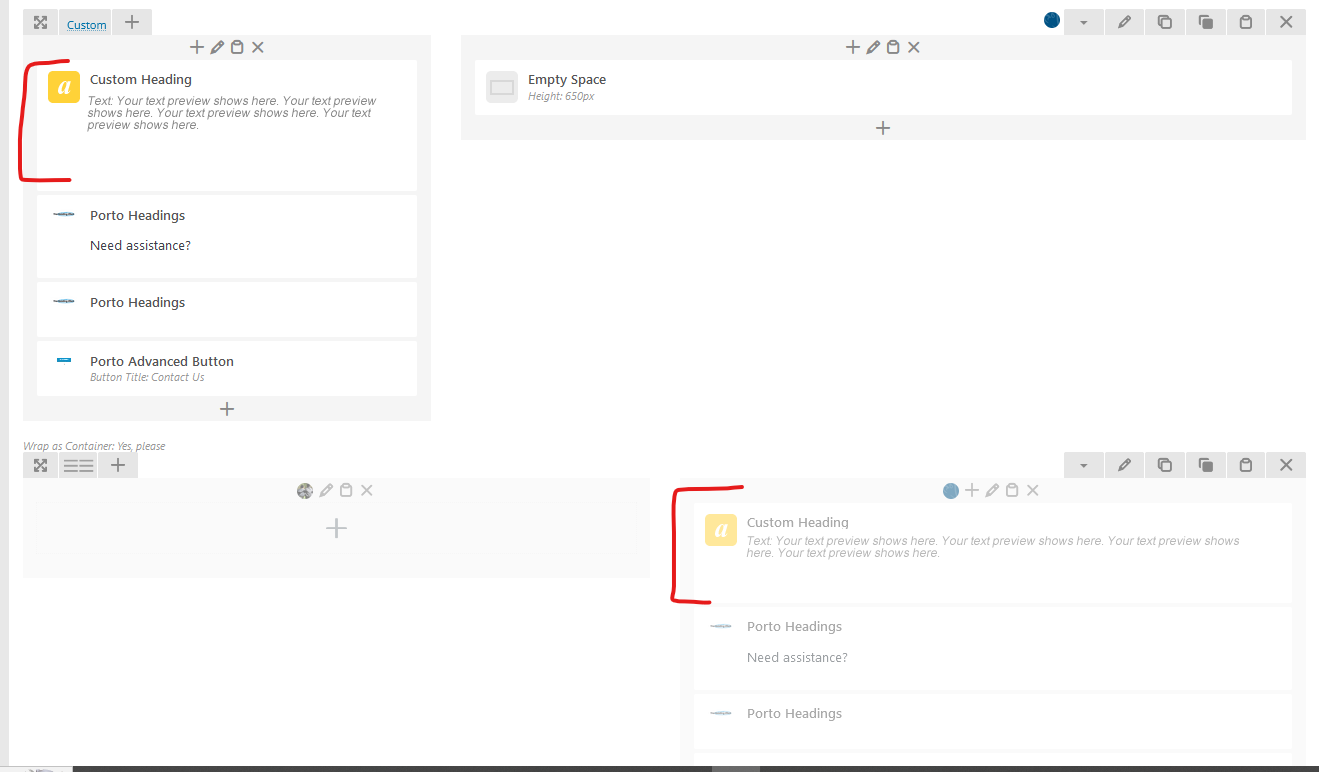
The “Desktop” content section is the first section. The “Mobile” content section is always below it and appears much lighter.
Whenever you see these sets and you need to update content for that section, simply ensure you update the same content in the mobile section too as you normally would following the “UPDATING CONTENT” instructions.
CUSTOMERS / USERS - MANAGEMENT TOOLS
This section covers your general customer management tools.
To block / unblock entire countries from accessing your website, follow these instructions:
COUNTRIES YOU SELL TO:
- WOOCOMMERCE > SETTINGS > then adjust the “sell only to these countries” values.
- Save.
FIREWALL BLOCK / UNBLOCK COUNTRIES:
Please note; the ability to block entire countries is only available to paid subscribers of Wordfence. You can still block individual users, but country blocking requires a subscription. For more info on this, please click [HERE].
- Mouse over WORDFENCE > then click on BLOCKING.
- In the ‘CURRENT BLOCKS’ table, look for the “Country Block” entry, then click on the pen edit icon.
- Under “Countries to block” click the PICK FROM LIST link. Selected countries show with a blue background.
- Unblocking: Click on a country name to unselect it.
- Blocking: Click on a country name to block it.
- Click UPDATE BLOCK button.
To block / unblock individual users, please follow these instructions:
BLOCKING USERS:
- Ideally have the user’s username handy. If not available then go into USERS / CUSTOMERS and search for it, then copy it.
- Left column menu click on USER LOGIN HISTORY.
- Enter the username in the username field and submit.
- Go to the IP ADDRESS column and copy the IP address.
- Mouse over WORDFENCE > then click on BLOCKING.
- Under “CREATE A BLOCKING RULE” click on “IP ADDRESS” as the block type.
- Paste the IP address you copied from previous step, then suggestibly for “Block reason” enter: USERNAME: blocked for this reason.
- Click BLOCK THIS IP ADDRESS button.
*NOTE: Please be aware that blocking a user will not automatically remove any content, orders, or comments they made. Administrators must still manually remove these items.
UNBLOCKING USERS:
If you need to unblock a user either because of a previous manual block, or an automated block (i.e. they accidentally entered wrong password multiple times and got blocked), follow these instructions to unblock a user:
- Mouse over WORDFENCE > then click on BLOCKING.
- Under the ‘CURRENT BLOCKS FOR…’ section, either browse through the list to locate the IP address in question, or within the ‘Filter by Type, Detail, or Reason’ type in the IP address or email address or username and click FILTER.
- Place a check mark next to the block record, then click the ‘UNBLOCK’ button above the record table.
MANUALLY CHANGE CUSTOMER PASSWORD:
To change password for a customer:
- Go to CUSTOMERS / USERS.
- Locate the customer of choice, then click on them.
- Scroll down to the ACCOUNT MANAGEMENT > NEW PASSWORD section and click GENERATE PASSWORD button.
- A field will open with a generated password. You can opt to keep that one, or replace it with any you desire.
- Scroll to bottom and click UPDATE USER button.
*PLEASE NOTE: Using this method will NOT send the customer an email about their new password. You will need to send it to them via other means.
SEND CUSTOMER PASSWORD RESET EMAIL:
This is the preferred method of resetting a customer password, which will send them an email with a link that allows them to click to reset their password.
- First ensure you are logged out of the website and have a copy of their email address. You can always opt to open a different browser to perform this.
- Go to the MY ACCOUNT page on front end of your website.
- Under the login box, click on the ‘LOST PASSWORD?’ link.
- Enter the customers email address and submit.
MANAGING CUSTOMERS:
- Go to CUSTOMERS / USERS to view all customers.
- Click on a customer of choice to view and edit their account.
NOTE: The “role” is important for customers. Roles described as follows:
- Customers: The default role for anyone who registers on the website.
- Subscriber: The role assigned to customers automatically who subscribe for a membership on the front end of your website. Needed for access to some areas.
FILTERING OPTIONS:
From the CUSTOMERS / USERS screen, you have various sorting and filtering options available.
- SORTING: Click on a column of choice to sort to sort by that column.
- SEARCH: On the right side of the screen next to the ‘SEARCH USERS’ button, you have an open text field for searching. This field works for searching by username, name (first, last or both), and email address.
ROLE FILTERING:
If you want to see customers only within a specific “role / customer type”, look for the text links just below the “Users” page title. It will look similar to this:
All (8) | Administrator (3) | Customer (5245)
Simply click on one of the available roles to view all customers just for that role.
There are various circumstances where a customer may tell you about an issue they are having which you cannot duplicate using your own account. This tool allows you to “shop as customer”, essentially logging you into their account so you can see what they see.
METHOD 1:
- From the top right of your current admin page, look for the “Howdy USER” and mouse over it.
- Click on the “Switch To Customer” link.
- On the next page use the pop-up to search for the customer by name or email address. As you start typing it will give you suggestions.
- Click on the customer of choice. You will now be logged in as the customer.
METHOD 2:
- Go to CUSTOMERS / USERS.
- Search, sort, or filter to find the customer of choice.
- Click on the customer, then scroll down and click the SHOP AS CUSTOMER button. You will now be logged in as the customer.
To go back to your admin account, click on the top message bar “switch back” link.
CUSTOMERS - ORDER MANAGEMENT
This section covers your customer order management tools.
The following documentation and video show you an overview of managing your customer orders.
https://docs.woocommerce.com/documentation/plugins/woocommerce/getting-started/managing-orders/
CREDIT CARD PAYMENT:
For orders placed with CREDIT CARDS, you can process refunds directly through the order edit screen.
- Go to WOOCOMMERCE > ORDERS, optionally filter your orders (i.e. click on PROCESSING, ON HOLD, etc.), then click EDIT on the order of choice.
- Scroll down to just below the ORDER TOTAL and click on the ‘REFUND’ button.
- You will be prompted to enter the refund amount (i.e. in case you wish to offer only partial refund or full refund), and to confirm you wish to do this via AUTHORIZE.NET GATEWAY.
- Complete your options and submit.
PAYPAL.COM PAYMENTS:
For orders placed with paypal.com, you will need to login to your paypal.com account and process the refund there using their provided tools.
TROUBLESHOOTING GUIDE
If one of your customers reports an issue with your website, please follow this guide. The more information you can gather and testing that can be performed prior to reporting an issue, the faster the chance of a resolution.
The more information you can get about the event, the easier it will be for your web development team or the plugin / theme author to help. Please try to get as much of the following information as possible from the customer:
- Describe what happened and where you were on the website when it happened.
- Please tell us what you were using to access our website by visiting the following site, then clicking the green COPY button and paste that into email response: https://www.whatsmybrowser.org/
We recommend performing the following testing to determine if the issue is site wide (i.e. everyone experiences this issue), or specific to that customer only.
- Repeat the steps the customer took using your own customer account and if possible the same browser they were using (even if the version is different). Did you encounter the same issue?
- If not then the issue is isolated to that customer’s computer setup and you should continue to #2 below.
- If so then move onto STEP 3.
- Login as User: In order to determine if the issue is isolated to their account or their computer setup, perform the following test:
- Open the same browser the customer reported using, then login to your website as an admin.
- Go into USERS / CUSTOMERS and locate the customer, then click on their account, scroll down and click on “switch user”. The site will refresh and push you to their “My Account” page.
- Follow the same steps they described in the event and see if you can duplicate it.
- If not, then the issue is related to their specific customer or browser setup. We recommend reporting back to them to try to update their browser to latest version and try again.
- If so, then the issue is with their account data within your website. Move onto STEP 3.
After completing steps 1-2, if needed then report back everything you have found during the previous steps to your website developer.